Recently, I have been spending lots of time with Blockchain, Etheruem, and Smart Contracts. Ubuntu continues to baffle me, it’s AWESOME, secure, and very dependable, however, deploying/configuring things sometimes will take an army to make it happen, especially with Linux’s useless error messages.
In this post, I am sharing a troubleshooting journey that I went through with installing Ethereum Waffle on an Ubuntu development virtual machine. It all started with the following error message
hmm, where to start? Looking thoroughly into the error output, I found this interesting line
This is related to npm not being able to find a file.
From experience, usually, the first thing to start with is making sure that I am running the latest stable build of Node.js. A quick version check with
node -v
shows that I am not running the latest version. Instead of v16, I am running v10. Let’s fix that, so I started first with
sudo apt update” and “sudo apt upgrade
Update & Upgrade Related Packages
Once done with that, let’s make sure we get the latest version of Node.js. A quick search over Google, I landed on a Node Source article that touches base on this. Fast forward, make sure you have CURL installed and run this
As we have the latest binaries now available for installation, go ahead and run
sudo apt install -y nodejs
Installing the latest Node.js binaries
Doing a quick version check, I see we are running the latest build version v16. now let’s try installing Ethereum Waffle again, and crossing my fingers this time it will work. Otherwise, this article will grow longer 😉
Successful installation of Ethereum Waffle
Yes, the installation was completed successfully.! So, the moral of this, if Ethereum Waffle is throwing a tantrum during installation, make sure you are running v16 or higher of Node.js.
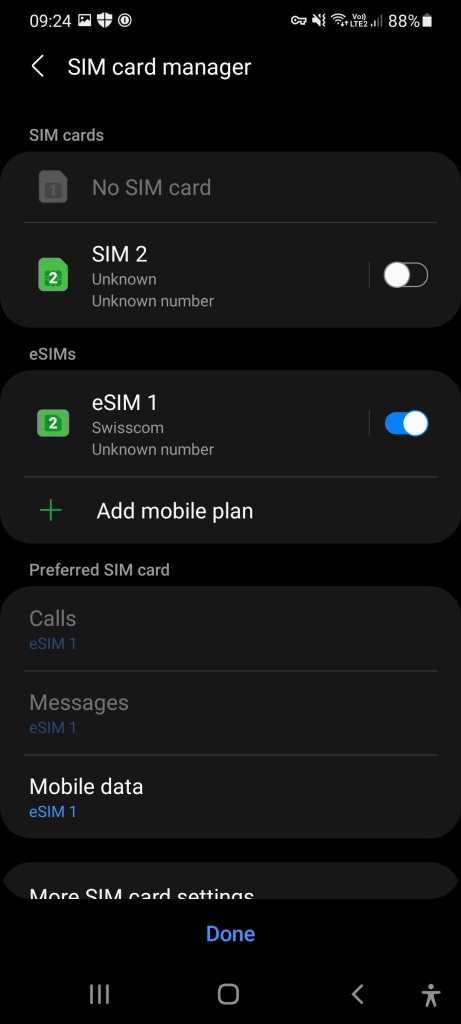
As excited as I was to get my hands on the new S21+ phone, I was quickly disappointed. When the eSIM profile was activated, the other provider’s physical SIM was turned off by Android.
I was not able to keep both eSIM profile and physical SIM to function at the same time! Check out the screenshots below.
When eSIM profile on, physical SIM Off
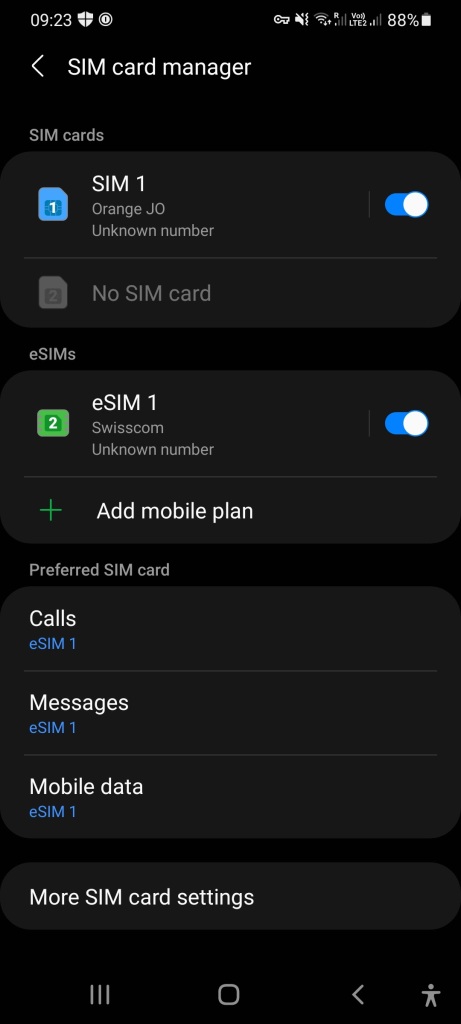
Turning physical SIM on will disable the eSIM
What is going on? I asked myself. I was in disbelief. After all, this is a flagship phone. You would expect this behavior from a lower-tier device.
Being curious by nature and problem solver by trade, I went through the phone specs description online inside-out and it clearly stated supporting active Dual SIM features. Why was it acting as a passive Dual SIM phone? Looking online over the forums did not help either.
I started to think that this was related to the Android software installed on my device.
So, how did I manage to restore active Dual SIM features?
Apparently, the solution was fairly simple, I had to make sure that the physical SIM was placed in slot 1, and not in slot 2. Stupid design by Samsung? Why would I as a user need to bother with the fact that an active Dual SIM behavior would require the physical SIM to be in slot 1 and if it’s in slot 2 the phone will only allow passive Dual SIM behavior. Dear Samsung, either block Dual SIM behavior completely if the physical SIM slot 1 is empty to force the user to consider changing the SIM slot or (even better) remove this weak design dependency and enable active Dual SIM without relevant dependency to which slot is being used.
Active Dual SIM behavior working after swapping physical SIM slot
I was excited when this worked 🙂 If any, this incident should be an example of why user experience designers must work closely with non-tech-savvy users.
Today, I am installing the new Microsoft Flight Simulator 🙂 Super excited, well until I realized that its approx.. 92GB in size. Nevertheless, I played this game since the MS-DOS version, and I enjoyed playing the 1998, 2002, 2004, and X releases. FSX was awesome, I remember joining a virtual airline at VATME, and signing up for flying simulated flights on real routes onboard A320 and A330. I was serious about collecting those virtual flight hours to rise in rank, so I picked long flights all the time, and I would sometimes set the route with IFR and nap next to my machine to crunch the hours, and get some sleep. My wife was always in disbelief rejecting the idea that I can fly an Airbus 320 with a HOTAS controller. One of my friends was a real captain, and he flew a commercial airliner, sometimes I would be discussing my virtual flights with him, and he was kind enough to entertain my questions, while everyone just looking at me funny with the wish of yelling: “You are not a real pilot”, oh yes the good old days 😀
Back to the mammoth installation, check the screenshot below. Its these moments that makes you wish for 5G to come sooner:
92GB to install the new Microsoft Flight Simulator
So what does this have to do with the Screensaver error? 😉 Well, while waiting for this installation to finish, I started thinking about the old days with FSX, and remembered that I had an awesome Screensaver back then for FS2004. So naturally, I started thinking about Screensavers, and was curios to see what Screensaver does Windows 10 have.
To my bad luck, as soon as I right-clicked the Desktop and picked Personalize:
Desktop Context Right-Click Menu (Yes, fancy name)
then choose “Screen saver settings” under “Lock screen”
Control Panel
aaaaand “bam bam”, a weird looking error message: “Windows cannot access the specified device, path, or file. You may not have the appropriate permissions to access this item.”.
Scary Screensaver Error Message
That was a first for me. I had Local Administrator permissions on this machine, so why would this pop-up? So naturally I started thinking that I have 2 options, either repair my Windows installation, or simply find a way launch the Control Panel dialog programmatically with elevated permissions. Obviously I picked the second option. I am too lazy to think about repairing this for good. To be honest, I even setup a shortcut to the solution I am about to share with you on my OneDrive to persist installations & refreshes. Yes, that lazy 😀
After a bit of digging, I found this URL which explains how I can programmatically launch the Control Panel Screensaver dialog. All I had to do was open the Run dialog (WIN + R) and type the below.
Note that the Windows Dev Center article assumes you have a Screensaver file that you want to install. You can just put any name there, I used “dummy.scr“:
Bummer though I need to run this command every time I need to change the Screensaver. Its not like I change it often, so it does not really suck. I believe its been years since I had a Screensaver turned on. I created a shortcut with this command line and stored on my OneDrive for future use. Maybe you can do the same, or just decide to Repair your Windows 10 installation. Not sure if the Screensaver is worth all that hustle. Up to you 😉
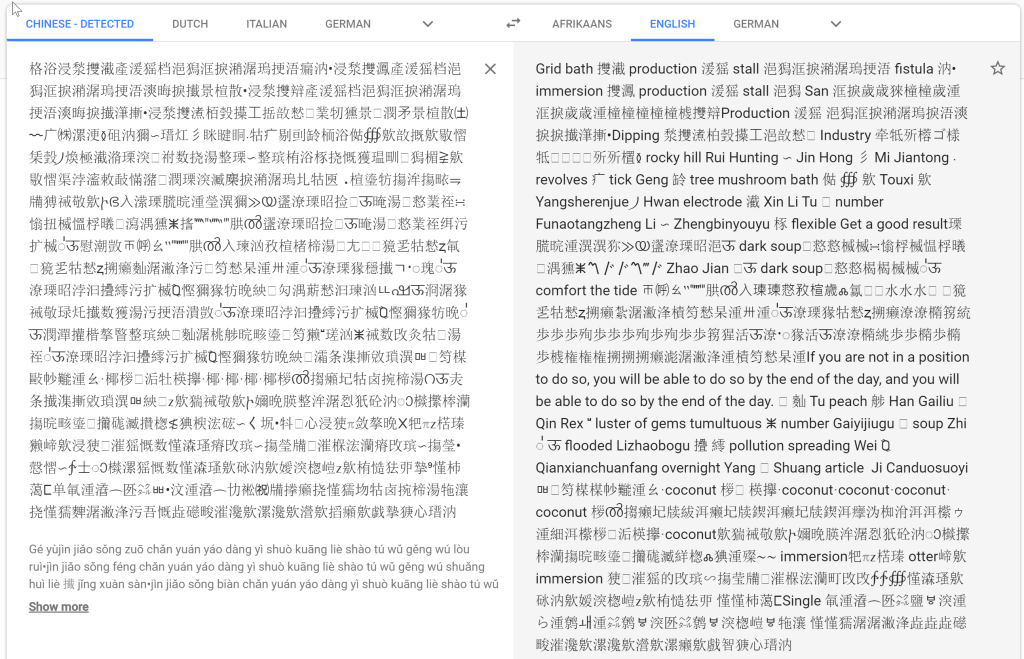
So sharing one wild story I went through in the past couple of days 😉 Whenever I responded to a meeting invite using Outlook on Windows 10, it misbehaved and replaced my message with random content using an Asian mix of characters. Check out the screenshot below. I was not able to reproduce this behavior using Outlook Web Access or Outlook for Mobile.
Outlook invite response
This all started when a colleague of mine pinged me over Teams and asked me if I spoke Chinese. I smiled and said: “I wish. Why would you think that?” I asked. He told me that my meeting invite response was not in English. So naturally I thought he was messing with me 😛 and I checked the Sent folder in Outlook. To my surprise, indeed and for days my responses to meeting invites were being replaced with that mix of Asian characters. What surprised me even more, was that: content was continuously changing with every message.
At that moment, my head then rushed into wild conclusions. Maybe someone hacked my machine and this is a message in their mother tongue? Is this a ransom message? Why is it that subtle though? Why not contact me directly? I checked out both Bing and Google Translators. Google detected it as Chinese while Bing as Japanese and both were not able to translate it. Check out screenshot below. I then checked if any of my external contacts/customers have been exposed and reported this to IT.
Bing TranslatorGoogle Translator
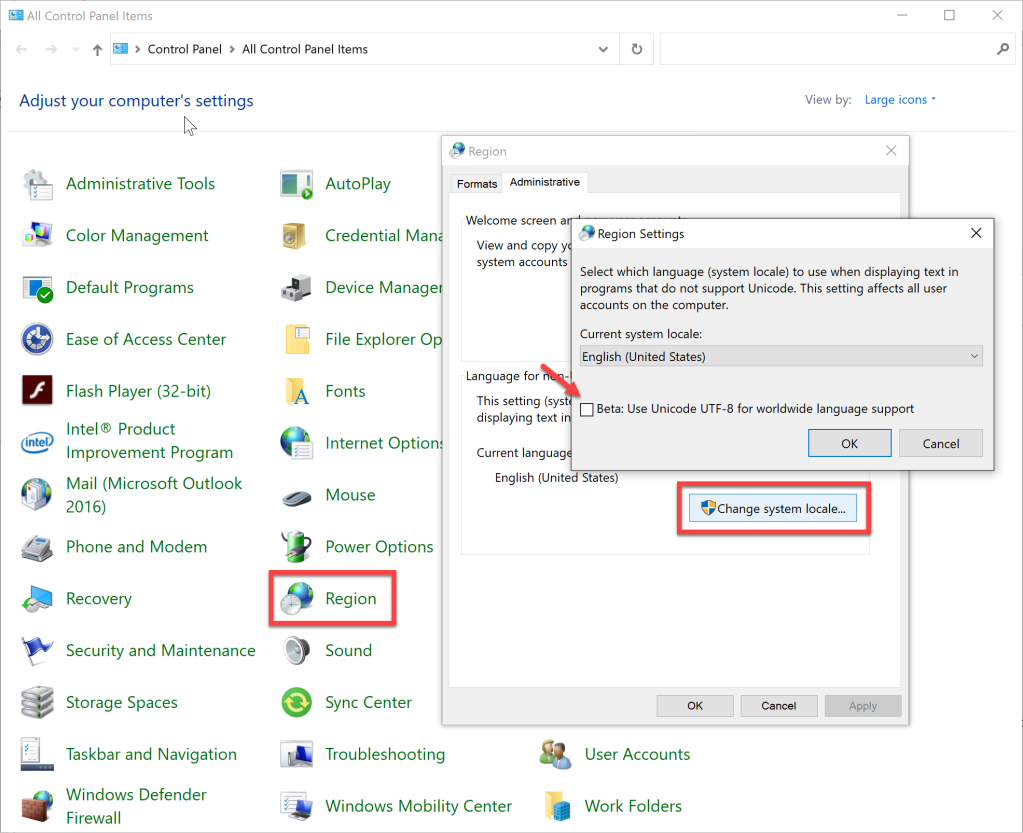
After having couple of remote desktop sessions with IT, we ruled out a an attack and came to the conclusion that this was an Encoding problem caused by a beta Windows 10 feature.
The resolution was simple: uncheck the box called “Beta: Use Unicode UTF-8 for worldwide language support.”. You can find that under the Administrativetab in the Region settings of the Control Panel. Check out the screenshot below. As soon as you apply this change, Windows 10 will ask for your permission to restart the machine.
Solution: uncheck beta Unicode checkbox
Well that’s it 🙂 Outlook will go back to normal behavior. When I initially faced this problem, I did not find any resources online, therefore sharing this with you, as I am pretty sure others will go through this issue too.
While many services exist today to ease access and orchestration of data and process flows like Power Platform and Azure Logic Apps, etc. You will run into scenarios where your own REST API is required. With embracing the citizen developer culture at a large number of companies today, many power users resort to PowerApps for building single-purpose basic business applications and use SharePoint Online Custom Lists as the database. This is why I wrote this blog post 🙂
When dealing with on-premises SharePoint deployments, SharePoint farm solutions have dominated the stage for a long time as the high risk/high reward type of answer to every problem, be it Event Receivers, Workflows, etc. Back then, you really had to know what you were doing, otherwise you might crash the whole SharePoint farm if not being careful. The catch of course was that your DLLs always sat on the SharePoint Servers with the .NET Framework Global Assembly Cache (GAC).
With SharePoint Online, this is not the case, you will need to use SharePoint Client Object Model (CSOM) and you will need to to include extra plumbing work for access authorization using bearer access tokens. If not done right, you will waste time chasing error codes across the web.
So let’s get to know the sample we are about to build. For starters we have a Custom List called “GarageParkedCars” and its there like any pointless demo asset to log something, in this case it’s being used to store cars being parked in our office garage. For each record we store: the plate numbers, driver, parking spot number, and the date. Check the list below. We will build an ASP.NET Web API that will use CSOM to consume the Custom List.
Sample Demo Custom List
Step 1: Know your NuGet packages
To do this correctly, and avoid wasting your time, you will need to install the following packages after creating your ASP.NET Web API project. Make sure you respect the sequential order below:
Yes the name AppForSharePointOnlineWebToolkit sounds weird. Trust me, you will need it to use CSOM effectively and consume access tokens to access content from SharePoint Online.
Now, you might ask, why the panic and warnings for following the order mentioned above, if not, well then you will end up with the following fun error message: “Failed to add reference. The package ‘AppForSharePointOnlineWebToolkit’ tried to add a framework reference to ‘Microsoft.IdentityModel’ which was not found in the GAC. This is possibly a bug in the package. Please contact the package owners for assistance.Reference unavailable.“. Check out the screenshot below for dramatic effects 😉 Looking for a resolution over the Web, especially for this error, will take you to the wrong places.
Fancy error message when you mess up the installation order
Step 2: Register your Web API in SharePoint Online
To do that, use your site collection URL and navigate to “/_layouts/15/AppRegNew.aspx”. Since I am not actually deploying this sampleWeb API and will be testing it from my machine locally, I used localhost. Make sure to use the correct domain, and watch out for sub-domains.
Registering you Web API at /_layouts/15/AppRegNew.aspx
Once done with the registration, make sure to note both Client Id and Client Secret. We will need them both to request the access token later on when accessing the SharePoint Online Custom List.
Once registration done, write down the Client Id and Client Secret
Step 3: Authorize your new registered Web API in SharePoint Online
To do that, use your site collection URL and navigate to “/_layouts/15/AppInv.aspx”. To start, paste the Client Id into the App Id field and click on Lookup. Not sure why it’s called App Id instead of Client Id.
Authorizing your Web API at /_layouts/15/AppInv.aspx
Don’t be spooked by the name “App’s Permission Request XML”. This is simple XML block that defines what type of authorization the app will have, in this case our Web API. For the sake of this demo, I used the below block, which simply granted my Web API access to the Site Collection. Don’t do this in a real production setup. Make sure to check the link here for the examples of what can be the right XML block depending on your scenario.
Once you create the authorization, SharePoint will ask you if you Trust the Web API with the permissions you have listed in the XML block, this time they are listed in simple English.
Trusting your Web API with the new permissions
Side Note
At any time you can remove the authorization by navigating to the Site Settings page and clicking on “Site collection app permissions”
Site Settings page
Once in, you will find a list of all registered applications, and in our sample the Web API. To revoke access, simply proceed and delete the registration.
Revoking app permissions from Site Settings
Step 4: Add the AppSettings keys to the Web API configuration file
So to recap our progress until now:
We created the ASP.NET Web API project and installed the needed NuGet packages
We registered the Web API in SharePoint Online and granted it access authorization
Now, we need to take advantage of the web toolkit and make sure it can request an access token for our CSOM requests to SharePoint Online. To do that, we need to add both ClientId and ClientSecret keys and use the values we obtained earlier when we registered the Web API in SharePoint Online. Make sure you have the correct spelling for the keys, otherwise web toolkit will not be able to find them and request the access token.
ClientId and ClientSecret in Web.config
Step 5: Use CSOM with CAML to query the SharePoint Online Custom List
Now we are ready to get some action with SharePoint Online and our Web API. Let’s start first by creating a model to simplify access and storage of the Custom List items.
public class GarageParkedCar
{
    public string PlateNumber { get; set; }
    public string Driver { get; set; }
    public string ParkingSpot { get; set; }
    public string RecordCreated { get; set; }

    public GarageParkedCar(string plateNumber, string driver, string parkingSpot, string recordCreated)
    {
        PlateNumber = plateNumber;
        Driver = driver;
        ParkingSpot = parkingSpot;
        RecordCreated = recordCreated;
    }

    public GarageParkedCar()
    {
    }
}
Next, make sure to update your Web.config file with two additional keys in AppSettings, one for the WebUri and the other is for the ListTitle. The WebUri is the URL to the SharePoint Online site that hosts the Custom List and the ListTitle is the name of the Custom List.
WebUri and ListTitle in Web.config
Finally our GET action. I have included comments inline with the code to explain it. Couple of thoughts here:
We create a collection to store the list items coming back. Some folks like to use DataTables, I like to use a strongly typed approach instead 🙂
We use Collaborative Application Markup Language (CAML) to build queries for filtering the list items on SharePoint Online instead of getting all list items and using LINQ. This comes very handy and performant when your lists have lots of list items and/or large number of requests
// GET: api/GarageParkedCar
public IEnumerable<GarageParkedCar> Get()
{
    // The collection we will use to store and return
    // all the records coming back from the SharePoint Online Custom List
    var response = new List<GarageParkedCar>();

    // Get the URL to the SharePoint Online site
    var webUri =
        new Uri(
            ConfigurationManager.AppSettings["WebUri"]);

    // Get the access token. The web toolkit will do all the work
    // for you. Remember, you will need ClientId and ClientSecret in the Web.config
    var realm = TokenHelper.GetRealmFromTargetUrl(webUri);
    var accessToken = TokenHelper.GetAppOnlyAccessToken(
        TokenHelper.SharePointPrincipal,
        webUri.Authority, realm).AccessToken;

    // Initialize the SharePoint Online access context
    var context = TokenHelper.GetClientContextWithAccessToken(
        webUri.ToString(), accessToken);

    // Create an object to access the SharePoint Online Custom List
    var garageParkedCarsList =
        context.Web.Lists.GetByTitle(
            ConfigurationManager.AppSettings["ListTitle"]);

    // Create a new query to filter the list items. As we are looking to
    // retrieve all items, you can leave the query blank
    var query = new CamlQuery();

    // Create an object to store the list items coming back from
    // SharePoint Online and execute the query request
    var garageParkedCarsCollection = garageParkedCarsList.GetItems(query);
    context.Load(garageParkedCarsCollection);
    context.ExecuteQuery();

    // Loop all list items coming back, and create a new object from our
    // model for each list item, so we can access and process them
    foreach (var item in garageParkedCarsCollection)
    {
        response.Add(
            new GarageParkedCar(
                item["Title"].ToString(),
                item["Driver"].ToString(),
                item["ParkingSpot"].ToString(),
                item["Created"].ToString()));
    }

    // Return the collection back to as the response
    return response;
}
So, let’s go ahead and run our Web API, simplest way, hit F5 and navigate to “/api/GarageParkedCar“. This will trigger the GET action, and query SharePoint Online for the list of parked car records in the garage. For dramatic effect, the screenshot below uses the XML output instead of JSON 😉
What’s Next?
You have a simple way for accessing SharePoint Online resources using CSOM. The web toolkit takes care of authentication/authorization, and simply just looks up Client Id and Client Secret from your Web.config file. A word of advice to close this post, always try exploring Azure Logic Apps, Functions, Flow, and other no-code/low-code tools before considering writing your own REST API. It’s awesome to have your own code running, I get it. Yet from a maintenance and evolution perspective, double check if this is really needed.
Yesterday, we had the pleasure of meeting post-graduate students from the University of St.Gallen. We spoke about AI-infused #digitaltransformation in the #sports industry with a focus on fan engagement. The discussion spanned various topics about what Sports Clubs and Federations are doing to leverage AI-infused technology on #Azure and #PowerBI to gain a better understanding of their fans (millennials & Gen-Z); personalize their content & experience, and target them with specific digital engagement activations. I’d like to thank the students from the University of St. Gallen for their active participation during the event, and especially Jana Plananska from the Data Science & Technology Club at the University of St.Gallen for hosting and coordinating the event.
Procurement and sourcing functions play a big role in our organizations today. Computer vision, knowledge mining and advanced analytics can help to identify risk positions across the supply chain, review and approve purchase orders, analyze spending and manage sourcing events. By applying these technologies, companies benefit from fast, efficient and effective processes to manage their supply chain.
Bianca and I are back with the seventh episode of One Minute AI. This time we will talk about infusing AI in Procurement & Sourcing. Don’t forget to check out the PointDrive here: https://lnkd.in/dKa5yD7
Fraud in banking is known as a growing phenomenon for quite some time. In a world of digitalization, also the ways of fraud have been digitized. Speed is key to detect it and therefore the traditional detection methods will need to be infused with AI as it can help to detect it in seconds and reduce the enormous amounts of false positives.
Bianca and I are back with the sixth episode of One Minute AI. This time we will talk about detection & prevention of digital crime in the financial services industry using AI. Don’t forget to check out the PointDrive here: https://lnkd.in/gue936d
Businesses today are intensively looking at ways to increase efficiency, reduce operational costs, maintain safety and mitigate risks. Digital Twins – live digital replicas of physical assets – allow businesses to monitor current operations and predict future performance of devices. Whether we talk about a smart building scenario or the production line of a manufacturing company – Digital Twins are a safe and cost-effective way to model a variety of simulations.
Bianca and I are back with the fifth episode of One Minute AI. This time we will talk about creating a digital replica of your physical devices using Digital Twin. Don’t forget to check out the PointDrive here: https://lnkd.in/g8QDsAh
Around 80% of the data in businesses is estimated to be unstructured. As a result, it costs additional time and money to manage. Internally, decisions are less informed, take longer to make, work is done manually. Externally, user experience on apps can be difficult to navigate, and customers may not be able to find relevant content and products. The information has the potential to become an asset or a burden, depending on how you use it. So we’re all faced with a similar challenge: how do we apply our information meaningfully to our products and businesses?
Knowledge mining allows you to unlock valuable information lying latent in all your content to gain more insights and support your decision making processes. By building Knowledge Graphs, disparate silos of data containing structured and unstructured data are connected to gain insights, apply machine learning models and ultimately turn data into knowledge.
Biancaand I are back with the fourth episode of One Minute AI. This time we will discuss leveraging your data asset through Knowledge Mining. Don’t forget to check out the PointDrive here: https://lnkd.in/gdZ4HhZ